Railtrack PNA

This is a rake of ten Bachmann PNA and other than my usual Spratt & Winkle fixed system  between wagons, they are completely standard. The rake includes each style of side reinforcements, five and seven bars.

This rake is an exercise in weathering using ‘Designers Gouache’, which is a water based paint that behaves like an oil based paint. The best thing about these paints are that they mix very well.  You can create depth and texture and if you don’t like your results you can wash it off with warm water. When you are happy with your results you make them permanent using enamel varnish. The only down side – they are a bit expensive for the best brands. I only use six colours!

As well as weathering the outside and underframe, I used this paint on the inside to look like wear and distress. I will eventually add some weathering powders to the inside of the wagons.  I have tried to vary the amount of weathering so that the rake looks realistic.

DSCF4167

DSCF4169

DSCF4170


DSCF4174

DSCF4176


DSCF4184

DSCF4187

DSCF4185

Seacow – Lima based

I detailed these wagons about 25 years ago, before the better Bachmann and Hornby models were available. There is no way I am going to criticise these wagons, as in those days, they were the best we could get and if you wanted something better, then you had to do it yourself.

I have put these on as a separate post because they are an exercise in a form of weathering called ‘dry brushing’. I used Humbrol enamel paints for this exercise. How to do this has appeared many times in magazines and I will not repeat it. In my opinion they still stand the test of time, and still look very much at home on my garage layout.

I did make some basic mistakes when I detailed  them, the main one was I used solid tops to the protectors instead of mesh – sorry. I also added some footsteps on the four corners. The hand brake wheels could also have been replaced with something more scale.

This a rake of five wagons.


DSCF4146

DSCF4147

DSCF4148


DSCF4152


WCR Mk2 Coaches

The middle of last year my wife and her friends went on a NENTA tour to Crich Tram museum. When I dropped her off at the station, I noticed that most of the stock was Air Conditioned Mk2’s.

I then decided I would like to build up a small rake, I thought five coaches topped and tailed would be nice. I purchased three, that’s all I could find at the local swap-meet and proceeded to strip them and paint them. This had to be another cheap project, this time I had to pay an average of £6 per coach for Mainline/Dapol  unboxed ones. Not as cheap as the DRS donor coaches!!!

Transfers this time were Railtec, and very good they are. Three down, two more to do.

Bachmann Collectors Club have just done a 37/7 – come on Bachmann how about a 47, or two!!!!!!!

DSCF4137

DSCF4139

DSCF4135


DRS Mk2 Coaches

This is a far more up to date rake of coaches. I went to Norwich to see the Class 37’s top & tail the Gt Yarmouth and Lowestoft trains, and although the stars are the 37’s, I thought it would be great to do the three coach rake.

I did not want to spend a lot on this project so I had a rummage at a local swap-meet and found three rather tatty Airfix/Mainline Mk2D coaches, 1 x BSO and 2 x TSO. I know these are technically not quite right, but they were £3 each – unboxed!

I already had a supply of DRS paint, so work started straight away. I sent for the appropriate transfers from R3sprays and they were soon finished.  Please note, I need to give them a slight weathering later. They look brilliant between two Bachmann 37/4’s.

DSCF4141

DSCF4142

DSCF4144


Scrap Train (1)

This is one of three scrap trains that I have made. This one is made up of five wagons, of three different types.

This rake dates from the late 80’s – early 90’s, and was typical of the days before privatisation.

The first types are three ready to run HSA’s by Bachmann. These have been filled with sundry cut-up bits of whitemetal and brass and then weathered. The HSA was a HEA with its hopper doors welded up, specifically for scrap.

The second type was a POA, this type were known as ‘Blackadders’, this is a scratch built body on a Hornby chassis. Again it was filled with ‘scrap’.

The third type of wagon was a bogie ‘Sheerness Steel’ wagon called a PXA. This was another of the excellent Appleby kits, the transfers were from the same source. Although I made this rake in the 90’s, I have obtained another PXA, part kit – no bogies, so the rake  could be added to when I obtain some bogies.

DSCF4124

DSCF4128

DSCF4132

DSCF4126


DSCF4133


Nuclear Flask with barriers & Brake Van

I guess this was the normal Flask train through the 70’s and 80’s. I saw this formation many times at Ipswich, to and from Sizewell.

The Brake van is a slightly modified Hornby, The two barriers wagons (RNA)  were made from Bachmann HEA’s with resin tops replacing the hopper. I believe the tops were to add weight to the wagons and were steel or concrete or a combination of both. I believe these tops were supplied to me from Appleby Models and are in resin.

The flask (FNA) itself was again I believe from Appleby and was in resin. I used Fox transfers for all wagons.

In these days, the train was hauled by a single loco – usually a Stratford 31 or 37.

DSCF4106

DSCF4107

DSCF4108

DSCF4109

Bitumen TTA Tanks

This is yet another rake of wagons based on the Hornby TTA. I have had two goes at these wagons. After originally making them in the late eighties, I further updated them about five years ago. Bitumen is a very thick product and before it can be unloaded it has to be heated so it becomes thinner. This is done in tubes that run through the wagon, there are also ‘chimneys’ on the top of the wagons to exhaust the fumes from the ‘Flamers’ which are on the opposite end to the ladder..

I first saw these wagons at my local station during the 70’s. The wagons were unloaded as described above and them pumped about 100 yards to  a ‘Tar Factory’ . This factory supplied tar in heated road tankers to local councils for road repairs/recoating, it was used with those lovely road chippings! If I remember rightly, the factory was operated by a company called ‘Printar’. Sadly the factory closed and the traffic ceased in the early eighties.

The wagons I built are about 90% correct and are a generic attempt, but again, something is better than nothing.  The wagon flamers and chimneys are made from Plastic Tubing and the hatches at the end of the wagons are, don’t laugh, drawing pins.

DSCF4114

DSCF4112


DSCF4119

DSCF4120

DSCF4121


TOTAL TTA ‘Class A’ & ‘Class B’


I run this as a TOTAL company train with six ‘Class A’ tanks and three ‘Class B’ tanks. Both types of tanks have some modelling differences.

The ‘Class A’ tanks are standard Hornby, repainted and detailed. The main transfers are Fox and they have  light airbrush weathering. Now for something a bit different – all the spillage from the tank fillers are ‘transfers’.  I purchased these from EBAY about ten years after originally finishing the tanks, they came from an American Company, and if I remember rightly, they only took four days to get here. I also purchased some rust streaks for use  on departmental wagons. Were they successful?  I really don’t know – sometimes I think they are OK, but on reflection I’m not so sure. What do you think?

The ‘Class B’ tanks were also Hornby TTA based, but this time the ends were replaced with Genesis Kits conical whitemetal ones. The straighter you can cut the ends, the less filler is required. Overall a great little project for something a bit difference.

DSCF4083

DSCF4084

DSCF4087

DSCF4088

DSCF4089

DSCF4090

DSCF4091


Nuclear Flasks with PFA Barriers

This is a flask train that ran after the Brake Van was no longer required. It is made up of two flasks and two barriers. I saw this train at Ipswich, on its way to Sizewell.

The Flask wagons are by Genesis Kits, a long time before the Bachmann RTR, and the PFA barriers were Hornby chassis, modified as required. All transfers were Fox.

The Genesis kits really went together very well and the castings needed little cleaning up. I used low-melt solder, but they can be assembled with super glue.

These barrier wagons were not the only type used, the most common seemed to have been cut down HEA wagons, although actual HEA’s were used on occasions.  No barrier wagons are used now, although all trains have to be double headed.

DSCF4097

DSCF4098

DSCF4099

DSCF4101

DSCF4102

DSCF4104


Fixed Spratt & Winkle for Wagon Rakes

After putting several rakes of wagons on this site, and having highlighted the couplings on several. I thought I had better explain  how and why I use this system. I must emphasise that this system is for ‘fixed rakes’ only.

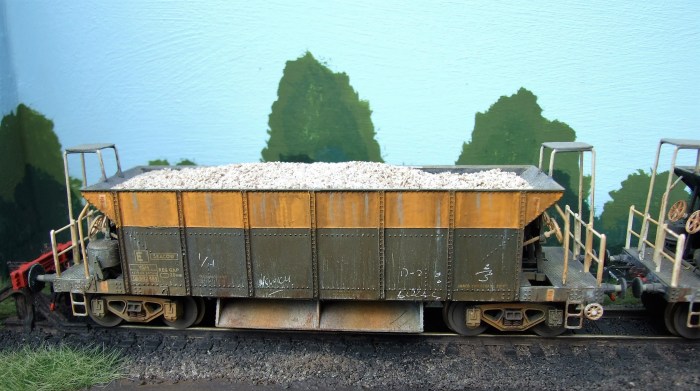
Firstly, on my garage layout (not on this site yet) the fiddle yard is very short of space. I calculated that in some of the smaller sidings, if I could save space between the wagons, I could have longer (more prototypical) rake lengths. If you go back to what I call ‘pre-modern’ tension lock couplings, the likes of Lima, Hornby  and Mainline, without being unkind, they were enormous. To say they look anywhere near prototypical distance apart is a joke!

The first thing I did was to lay down some rules:-

The fixed coupling must negotiate  3rd radius curves – to make sure they did all couplings would be tested on 2nd radius curves to ensure OK.

The distance between wagons must be reduced dramatically – priority would be four-wheel wagons of all wheel bases.

The original chassis must be used – no expensive modifications.

The new system must be discreet and much less obtrusive.

I also wanted to have representations of Vacuum Brakes, Air Brakes, Coupling Hooks and 3 link couplings/instanter couplings.

The first wagon would have a modern tension lock on one end to couple to the locomotive. This could be modified to decrease the gap. All the loco’s I use on my garage layout have a detailed buffer beam at one end and tension lock at the other.

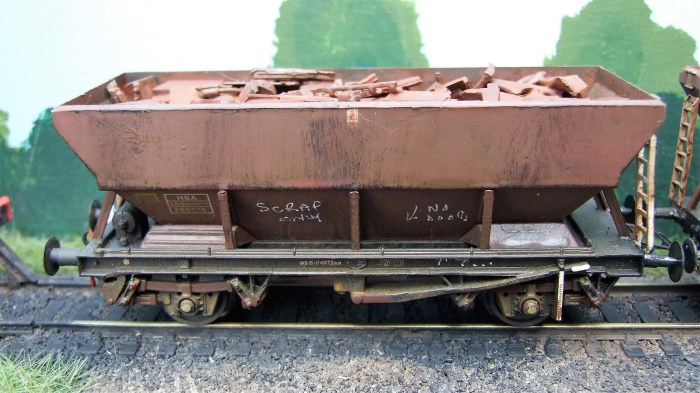
The rear wagon would have a prototypical coupling, Screw, 3 Link or Instanter. A tail lamp and pipes would also be fitted.

I would also number the wagons (underneath) so that would always be assembled in the right order.

Now the work started, I did trials with various ideas. I won’t go through these as most were total failures! I would also say that whatever I came up with looked like a small tension lock hook, a Spratt and Winkle or a Dingham’s hook. I concluded I was trying to ‘re-invent the wheel’. Common sense prevailed and my final choice was ‘Spratt and Winkle 3mm couplings for 4mm stock. Yes I did try 2mm Spratt and Winkle’s on some small wheelbase wagons, VEA’s I think, but you have to lengthen the loop to fit, this defeated the object. The one final thing I needed to do was to pick a standard wire for the loops. I tried various thickness and settled on ‘Gibsons .7’.

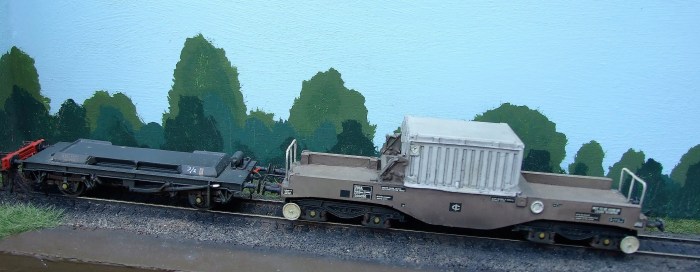
I later moved on to bogie wagons. These very much depend on the length of the wagon, the shorter ones can go on the buffer beams as per the four wheelers, but the longer ones need to be attached to the bogies. Please note I do not use this system on coaches as there are better solutions for them.

I also ‘chemically blacken’ both the Spratt & Winkle’s and the Brass Wire, giving them a good clean first.

There is no reason why you should not add a ‘working’ Spratt and Winkle into a rake so that it can be split for shunting.

DSCF3979

DSCF4070

DSCF4068DSCF3952