SM32 WW1 Further Progress

A meeting this afternoon with Graham. He brought his ‘Tin Turtle’ with him for some gauging tests. A little trimming was required, but it soon had good clearance. We may still have issues with the tallest wagon required on the layout, to this end Graham has purchased a kit of an ambulance covered wagon so that we can test further. This part of the layout will now be left until we can test.

More work has been completed over the weekend including work on the back-scene, drainage ditch, rough ground between the ballasted area and the dilapidated barn.

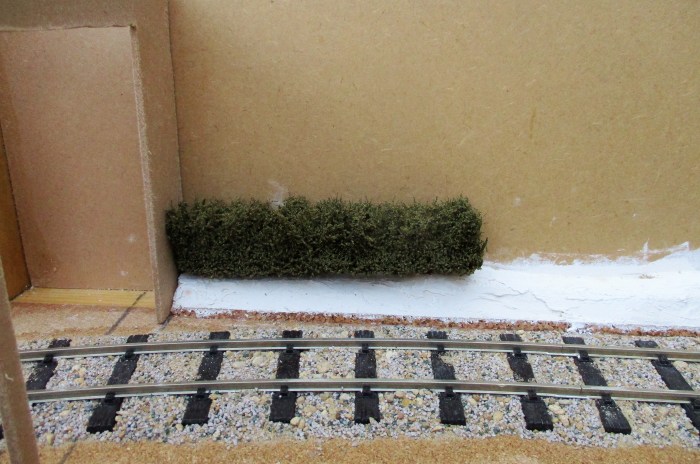
One thing that I have tackled today is the track on the first board. We found out that the temporary narrow gauge railways of WW1 used unseasoned or dipped sleepers, so  they were basic wood colour and not the treated dark brown colour. I experimented and mixed up some basic wood coloured paint and painted the sleepers, when dry I added some Coloron Wood Dye over the paint. It seems to have worked, but I will check in the morning and add another coat of Wood Dye if necessary. I have also painted the track sides and highlighted the chair with dark rust paint.

Below are some photo’s in the order I completed them.

IMG_6012

IMG_6013

IMG_6014

IMG_6015

IMG_6016

IMG_6017

IMG_6018

IMG_6019

IMG_6020

IMG_6021

IMG_6022

IMG_6023

IMG_6024

IMG_6025

IMG_6026

IMG_6027


SM32 WW1 Layout – progress early July

The ballasting has now been completed on both boards – I will remind you that ballasting is made up of sand, grit, earth (wargaming war dirt and medium stones) and a little O gauge real ballast to top up. These railways were only used for two or three years maximum and anything to hand was used as ballast. I think the look is of a ‘temporary’ railway only.

The small drainage ditch along the front of the layout has been fashioned in cork and in real life even the soil from this was also used to ballast. Although the drainage ditch is only a scale 3′ wide, it will have water (varnish) added so it looks deeper than in really is.

The next thing I tackled was the bank at the back of the layout. This was made from three layers of 1/4″ cork glued together and then shaped as required, it was then covered with a thin coat of Polyfilla. It will then be glued against the backscene, painted and flocked. The final part will be adding hedging, bushes and small trees, some photo’s show the hedging balanced on the bank to see the effect.

The final part of this update, was a decision that had to be made, and we have decided that the tracks that emerge from the fiddle yard will be through a dilapidated barn. When these temporary railways were laid, nothing got in the way and buildings just had holes knocked through to gain access and any original doors were simply taken off.

Having not modelled this gauge before, I keep the one wagon in my possession and a couple of scale solders on the baseboards  to remind me of what scale I am working in. The swing on the bogie wagon through the entrance from the fiddle yard has been checked, however we do not have the tallest wagon available and this does cause some height concerns!!!  The basic sides of the barn have been formed as a template and test fitted.

IMG_5998

IMG_5999

IMG_6000

IMG_6001

IMG_6002

IMG_6003

IMG_6004

IMG_6005

IMG_6006

IMG_6007

IMG_6009

IMG_6010


Two more wagons for Morlock Heath


I have said two more wagons for Morlock Heath, but these will mainly been seen on Ashwell Moor, my sons O gauge stabling point that I made for him last year. I am hoping these wagons will also appear on Morlock at Exhibitions.

Again before weathering I put a light coat of matt varnish with a little matt white added, this just dulls down the brightness and gives a more care-warn look. after this the usual methods were used, shadowing followed by airbrushing, finishing off with a little dry brushing.

ZDA

IMG_5983

IMG_5984

IMG_5985

IMG_5986

VAA

IMG_5987

IMG_5988

IMG_5989

IMG_5990

There are several posts on the making of Ashwell Moor on this site if missed last year.


Graham’s Test Track

When I finished my test track Graham expressed an interest in having one himself. Due to being very busy at present I offered to do the basics for him.

This Test Plank differs from mine in having O, OO and N Gauge tracks, it has also been left to Graham to choose whether he uses DCC or DC control on the space provided.

The O and OO  tracks have magnets and templates for fitting and testing ‘Spratt and Winkle’ couplings to stock. All tracks can be fitted with clip on rolling roads as required.

IMG_5975

IMG_5982

IMG_5981

IMG_5980

IMG_5979

IMG_5978

IMG_5977

IMG_5976