New Class 37 Backdated

I purchased a Blue Split Head Code Class 37 by Heljan. This Loco had Black Head Codes with white marker dots, I therefore had to backdate it for my era of 1967-68.

After some research I decided I would make the Loco D6753, this was a bit different to most early blue 37’s. It had the new BR Logo on each cab side with the number above as opposed to having one on the bodyside.

After carefully removing the bodyside logo all new transfers were added, this included adding new head code numbers and letters.

All add-on accessories were painted and added. The Loco is still to be varnished and weathered, but this is on a large ‘to be done’ list.

It was nice to do something a bit different and by this time it was a local (to me) Engine being based at Ipswich.

Footplate Crew – Jury is out!

Over the years I have added crews to some Steam Loco’s, although it was not a policy I had set in stone.

After buying some cast Railway Staff and some 3D printed ones, I duly painted them and tried a few in some recently weathered Loco’s.

IMG_2429

IMG_2431

IMG_2432

IMG_2435

IMG_2437

With trains on the move, it is great – still not convinced about having several Loco’s stabled on Shed all populated.

I still have several crews already painted so will post some further samples later.


Departmental Sentinals Weathered

The weathering on the three new Dapol Sentinals is now complete. All will have a crew added later, I am painting them at present, I am also researching whether they carried lamps – if so, what code were they.

The Y1 No. 37 and Y3 No. 38 were both Lowestoft allocated Loco’s, they appear to have worked at the ‘sleeper depot’, in the main goods yard and on the Harbour Works Trains.

The third Loco is Y1 No.4, this was allocated to  Ranskill Wagon Works near Doncaster.

Whether they all ever met is doubtful, but they certainly will on my Mission Road Layout.

IMG_2413

IMG_2414

IMG_2415

IMG_2417

IMG_2421

IMG_2422

IMG_2423

IMG_2424

IMG_2425

IMG_2426

IMG_2427

Sentinal makeover finished

I have now finished turning the LMS Sentinal into a Lowestoft Class Y3. It is still to be weathered but is essentially finished. The transfers were excellent and worked well, I also added real coal to the bunkers.

While I was finishing the Ex LMS Sentinal, I decided to have another look at my Y1. It was originally as delivered as number 39, after a bit of research I decided to change it to number 37, this gave me a second Lowestoft Loco.

Y3 – No 38.

IMG_2403

IMG_2404

Y1 – No. 37.

IMG_2407

IMG_2406

Y1 & Y3 together.

IMG_2410

IMG_2411

IMG_2409

Note the different types of lettering due to the Y3 having side grills, the Y1 has none.

I will post a final few photos when weathered.

Sentinal Make Over

I took advantage of Hattons O Gauge Sale and purchased another Dapol Sentinal for £130, which I thought was a bargain.

This will be a total change of identity and region, and will become a Civil Engineers Loco. I have done a little research and two loco’s match my requirements for a Lowestoft loco, a bit more research still needed.

I have already taken off the vacuum pipework, the next steps will be to remove the LMS and numbers and repaint as necessary. I will also paint the buffer beams red, as they should be.

I have purchased some ‘Old Time Workshop’ suitable transfers that will give both options for my chosen loco.

Updates as I proceed.

IMG_2385

IMG_2386


IMG_2388

Different Weathering Methods – Steam

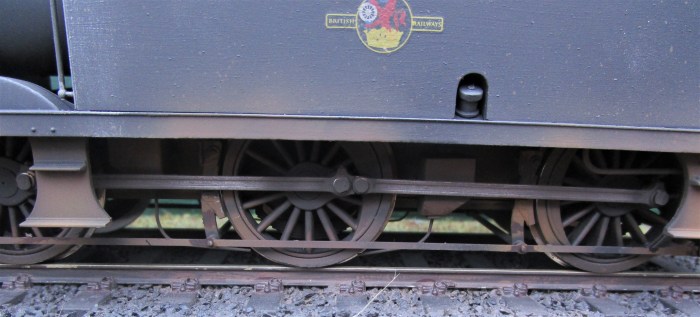
Today has been extremely hot and Airbrushing was just about out of the question. I was looking through some photos of steam engines, especially weathering on the connecting rods and the motion.

I started to have a look through my enamel paints and see if any colours could replicate the weathering I was seeing. I found a Railmatch Jar marked up ‘oily steel’ and thought that it was worth a try.

I picked a Jinty and a J94 to try the new method on. I will add that I used to just leave the overspray on the connecting rods etc. They looked OK but did not stand scrutiny based on the photos I looked at.

Here are the results – I think its an improvement.

IMG_2376

IMG_2377

IMG_2374

IMG_2375


Class 33 – weathering – next attempt

I have certainly spent a lot of time on this Loco and truth be told it has drained my confidence a bit. Anyway I masked the roof and the chassis/bogies off and loaded the Airbrush up with ‘true’ BR Blue not that horrible faded stuff. I then sprayed over the light blue that was not covered by weathering, I think I should have done this earlier rather than try and weather it away, but we all have to learn the hard way. After spraying the real BR Blue I cleaned all bits of overspray away.

Well here you are a few photos, am I happy, probably not, but it is certainly better than it was.

The first photo is a ‘before’ and the next four are ‘after’.

IMG_2344


IMG_2360

IMG_2361

IMG_2362

IMG_2364

Heljan Class 33 Weathering !

I think the title is a bit misleading, it is more a re-weathering. I purchased a factory weathered Loco that was going to be the base model for a Loco that was always one of my favorites. The re-numbering certainly was not easy due to being already weathered. I have to say that the factory weathering was about what I expected and left a lot to be desired, I was especially a bit doubtful about the ‘faded blue’ as it was just too perfect and even.

I decided to have a go at re-weathering it over the top of the original factory weathering. Special attention would be given to the Roof and Exhaust, and the Bogies which were a one colour splurge.

I have tried to make the colours more variable across the Loco and tried to dull down most of the Blue with misting and wash and wipe. I don’t think the prototype was ever as dirty as this but needs must!

Well here are the results, I feel it is an improvement, but I am still likely to have another attempt later.


IMG_2342

IMG_2343

IMG_2344

IMG_2345

IMG_2346