Again I have been quite busy working on the layout. The bridge is now complete and weathered. I have installed the magnets for the Spratt and Winkle couplings. The basic grassing has been started as has the painting of the backgrounds. The Coal Staithes have been glued down and weathered with spills etc. I still have some sacks of coal and a weighing machine to add.
Lots of progress over the last few days, the back scene is painted, all buildings etc. are weathered, road vehicles weathered, bridge cladded in blocks, coal added to staithes and the mounds are now ready for grassing.
Nothing is glued down at present. Next job, more work on backscene and paint and weather the bridge.
Below are a few photos but due to the dull conditions they are not great.
Work on the layout continues, The banks to form the grassy areas has been made, they will now be covered with Mod-roc before painting etc. I have now painted all the buildings and structures, they are basically painted and have had polyfiller rubbed into the brickwork, I then used Coloron Dye to tone the polyfiller down before coating everything with matt varnish. I now need to touch up the corners of the buildings and then weather the lot.
Due to bad weather yesterday I had to change my plans and continue with the layout as opposed to doing some Loco/Wagon Spraying.
The track and surrounds are now fully weathered with Railmatch Sleeper Grime and Matt Black, all hand brushed, The buffers have been top coated and weathered. The Coal Staithes have been painted but not yet weathered. The yard Crane has had a coat of Matt Black and will have some parts picked out in Red before weathering.
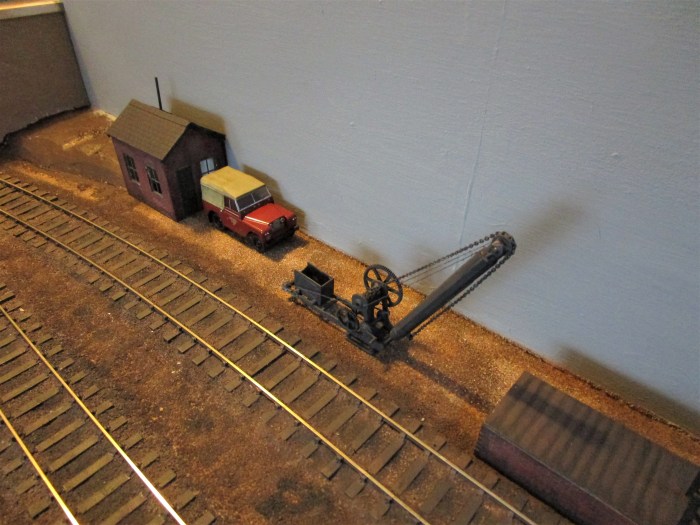
I have placed all the buildings on the layout and will paint them as I get time. I also intend to have some grassy mounds up against the bridge walls on both sides. I will also make some point rodding to the ground frame.
One of the worst jobs when making a layout is ballast picking and tidying. In other words removing any ballast that defies gravity! I have also given the ground cover a quick sandpaper to remove and humps and bumps. I will make a few puddles etc. in the ground cover later.
I have painted the Buffer Stops in undercoat and painted the track edges with Railmatch ‘sleeper grime’. When I weather the whole trackage area the edges will get further discoloured.
All the ballast/sand has now been glued down and the basic ground cover finished. The ground cover was done using coloured sawdust and sand. The whole layout needs to be allowed to dry for around 24-36 hours.
When all is dry the track will be tidied up by picking all stray bits of ballast etc. from odd places. The sawdust will be taken down and flattened by sandpaper.
The dry ballasting is done – but how and why did I do it this way? The first thing to remember is what part of the railway you are modelling. This is a small goods yard, it probably has not been re-ballasted of tamped since it was laid, possibly 50 – 100 years, so it must reflect this. I have seen fantastic layouts in both O & OO and they look immaculate as they have been ballasted with mainline ballast. Some very old yards and goods facilities would not have had good ballast when new, let alone after many decades. I would think that some may have even been laid on cinders or similar.
For Little Sefton I am using N Gauge ballast and Childrens Play sand. The heavily used area is about 90% sand and only a sprinkling of the N Gauge Ballast. The less used areas are almost neat N Gauge Ballast.
I have to say I have used several methods of making well used areas look the part, this includes using DAZ Modelling Clay and adding Polyfilla to the dry Ballast – I would say both these methods worked, but I thought I would have a go at N Gauge and Dry Sand, we will see.
After wetting the ballast and using a dropper to add 50-50 PVA and water I will after drying hand paint the whole area.
Well, as you can see, I have chosen a title for the new pointless O Gauge layout. The title reflects a smaller form of a previous layout.
All the buildings are made and smaller details purchased. The position of the buildings has been decided and await painting. The only thing that may change is the yard crane, the one in the photos below is one I purchased for my station layout that is ‘paused’ at the moment. I have ordered the Peco variant and that is likely to fit this layout better.
I have also purchased two BR vehicles and a further small lorry is likely
Next step will be ballasting and basic scenics, fitting in painting buildings between ballast drying times.
Yet more work on the new pointless layout. The Goods Shed is complete, the Yard Crane is undercoated and the Coal Staithe has arrived. I have made the three required Buffer Stops and most importantly I have made a Small Bridge that will carry a pipeline over the yard. I have used the pipeline bridge on several layouts, I can not stand ‘a cut out in the sky method’ . All the above need painting and weathering. I still have a few options on Huts etc. but due to current postal deliveries being very late – I still await some parcels.
Nothing complicated here, just a few options for running trains. The fiddle yard is connected to the controller and then all three scenic tracks are connected to the fiddle yard. I have added three ON/OFF switches to the three scenic tracks so that you select which track you want to use if running more than one Loco. There is also a standard isolating switch on the nearest track for shunting manoeuvres. I am using a Gaugemaster Combi Controller as only small DC Locos will be used.
Now for a good clean up and continue making buildings for the layout.