Darstead BG Engineers Tool Van

This is a Standard Darstead BG that I have numbered and lettered. I then replaced the knuckle couplings with screw couplings and weathered. Note – I did a wash and wipe with dilute Matt Black paint in all door lines to create shadow before airbrushing.

IMG_0094IMG_0095

IMG_0096

IMG_0097

The transfers are Railtec.

Darstead O Gauge coaches

Here are two Darstead coaches, one in Maroon and  Crimson and Cream. I must admit I am warming to Darstead products, they are very robust and although they have a few minor issues, certainly look the part.

IMG_7751

IMG_7752

IMG_7753

IMG_7754

IMG_7755

IMG_7756

IMG_7757

MTH O Gauge Coach weathering


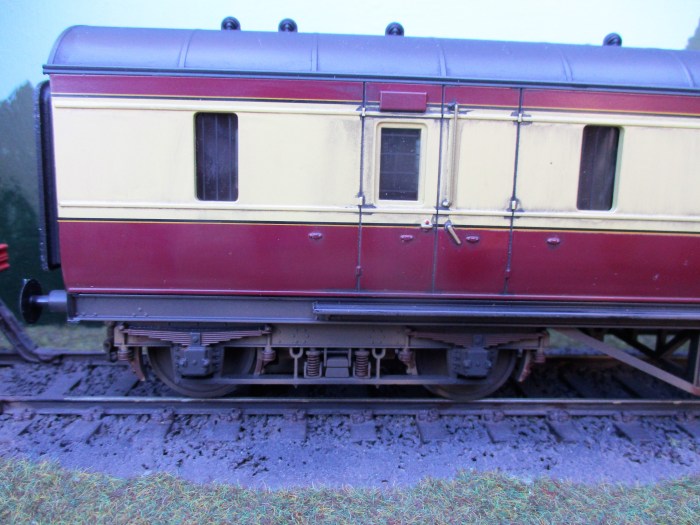
I purchased these coaches over five years ago and for some reason they went onto the back burner! As I am now putting coach rakes into stock boxes, I thought the time was right to number and weather the stock as I put them in their new homes.

The Stanier based coaches were competitively priced and as such were ripe for weathering. Before I start, these coaches have lots of good points, sturdy build, well painted and fine scale wheels. On the downside was non flush glazing, bright wheels and no end buffer beam pipe work. They also have internal lighting, which I will not used. I would have rather MTH concentrated on better detailing that the lighting gimmick!

Weathering followed the usual method, so after shadowing all crevices etc. I used the airbrush for the main colours and then finished off by dry brushing springs etc.

Conclusion, after weathering I think they are a great addition to my stock, I think a Jinty hauled train on my new station layout will certainly look the part.

Full Brake

IMG_5966

IMG_5967

IMG_5968

Brake second (ex 1st)

IMG_5969

IMG_5970

IMG_5971

Corridor 2nd (ex 1st)

IMG_5963

IMG_5964

IMG_5965


Visit by Shaun Today for Weathering.


As well as discussing several projects for Morlock Heath, we also had a little weathering session. These were all for Shaun’s layout, Princes Street Goods. Making a change from his usual Diesels, these included two steam engines, as well as a Buffet Coach.

Shaun’s layout is designed to run several era’s, so a return to steam in the early sixties is not a problem. The coach was for his later era, early seventies.

The Terrier is Light-Medium weathering

The Jinty is Medium – Heavy

The Coach is Light.

IMG_5744

IMG_5749


IMG_5750

IMG_5748

IMG_5747

IMG_5751

IMG_5752

Shaun will take some more photo’s on the stocks home layout and then post them on his website.


Shaun’s Rake of Mk1 Coaches

Over the last few months Shaun has started to get a small rake of O Gauge Heljan Mk1 Coaches together, We have been trying to lightly weather them as they arrive. The main thing is to get shadow and depth into the door crevices using dilute matt black paint. It soon became clear that Heljans attempts in this area were not quite as expected! Determined to add some depth to the doors we had to compromise, below are the results.

The Heljan attempts at  Mk1 Coaches are well documented and the new Darstead models have issues – please Dapol get it right.

C0481297F3F54B31AF75B2963A8869A6

B8DF6F12F2FA44EC8AC508A339384B05

062BFFA100954A03B63DDA6D6561EA73

25F3A799B10647A6ABD9E813B01EF024

!cid_image014_jpg@01D3F5E7

This photo shows a before and after.

Shaun has enlarged his Blog/Website recently and has done a great article with photo’s of how he built the coal yard part of his new layout. Have a look it’s worth it.

https://princesstreetgoodsyard.wordpress.com/categories/the-coal-yard/


MTH Stanier Full Brake in O Gauge.

I purchased this item about four years ago, it cost about £100, other than look at it and check it was OK, it has remained in its box.

I have recently made a SPV (Parkside Kit)  and thought that these two items running together as a small branch line parcels train would look good. The Coach was then taken out of ‘stock’ and weathered in line with the van. This was my first attempt at weathering a MTH product and I have to say I am rather pleased with the results. I must admit I don’t know whether they are still made, but you do see some for sale occasionally.

Will probably add a few ‘chalk marks’ later.

IMG_5694

IMG_5695

IMG_5696

IMG_5697


April O Gauge Oddities

Below are some hastily taken photos of some weathering undertaken this week. There are both steam and diesel from various eras. This includes two consecutively numbered Heljan Class 25’s and two JLTRT TTA tanks, one Medium weathered and the other much lighter.

IMG_5200

IMG_5198

IMG_5204

IMG_5202

IMG_5210

IMG_5209

IMG_5211

IMG_5212

IMG_5208

IMG_5207

IMG_5206


O Gauge MK1 BG’s -weathering

Here we have two Heljan BG’s that have been light-medium weathered for my friend Shaun for his latest layout.

The bodies/roof  were lightly weathered – but the bogies and underframe were medium weathered.  I have also picked out all hinges in dark grey to highlight the doors.

IMG_3831

IMG_3832

IMG_3833

IMG_3829

IMG_3830

IMG_3828


O Gauge STOVE ‘R’

While browsing Ebay I saw a rather old Westdale kit on a Buy it Now. It said it was ‘complete’ but I had my doubts. I duly purchased the kit for the BIN price and waited for its arrival.

On arrival it was clearly not complete, only having one end was not good, but at least I could use it as a template to make another. Although the kit was basic I have to say it went together very well and after adding a few extra bits I fashioned myself, I was very pleased with the results considering there was no instructions.

I painted the model in early BR Crimson livery and then did a medium weathering job. I may well change this to heavy later, so that I can run it with a couple of milk tankers to form an early sixties ‘milk train’.

IMG_3781

IMG_3782

IMG_3783


BR Southern Mk1 2nd Brake ( O Gauge)

While I was browsing through the second-hand suppliers I came across this coach for sale at a very reasonable £100. I knew it was not finished, but it had potential.

It was kit built from a ‘Easy-Build’ kit and considering the basic kit is £135, I took the plunge and purchased it. I also wanted to assess the kit and whether there could be options for buying further kits.

The Coach duly arrived and I was very impressed with the kit and the way it had been built. I then started to finish it off and here are the results.

The only downside was that the person that made the coach decided not to flush-glaze. I looked at removing it, but it was to firmly glued in. I will probably ‘blacken’ the window step to enhance the appearance a bit.

Would I buy another new kit, yes I would, and probably will

DSCF5460.JPG

DSCF5461

DSCF5462

DSCF5463