Heljan 31’s (Refurb) 2nd Batch

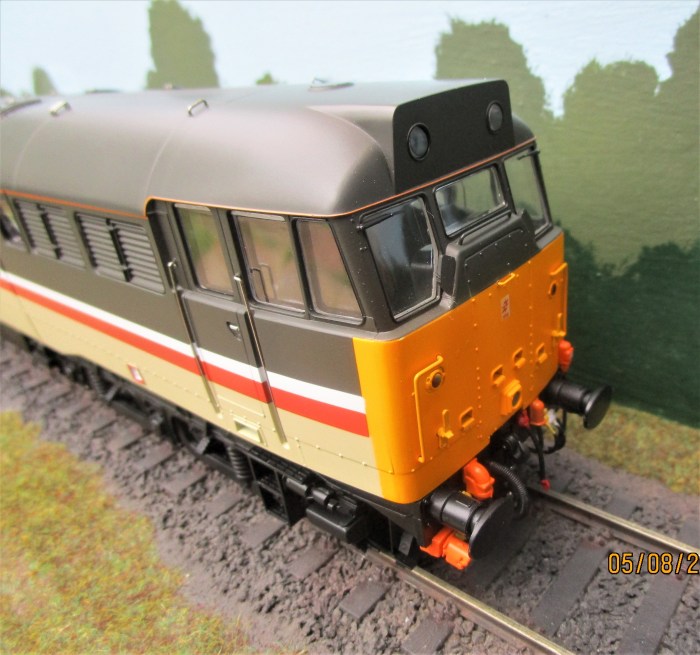
My second batch of two 31’s arrived today. After they were unpacked and tested I started to research appropriate numbers for each livery. This may sound an easy job, but the prototype changed in many ways and there are many mistakes that can be made. The only true way to complete a accurate model is to have photographs of each side and end in your chosen livery. Some of the differences are:-

Headlight fitting and position.

Bodyside Grill reversal.

Reinforced Drivers front window.

Radio roof Pod fitment

Roof Fan grill cowl

Snowplough fitment

After much research and help from friends, the below are my number choices:-

Red Stripe Railfreight —– 31219

Blue with orange cant—– 31442

I/City Mainline————-31407

3T Grey Construction——31155

Dutch———————–31163

I will recheck these before starting the numbering process.

Heljan Class 31 (refurbished)

At long last the refurbished Class 31’s that I ordered nearly a year ago have arrived. After being very critical of the last original batch of 31’s, I feel that I ought to just say how I find their latest offering.

Firstly the packaging has been upgraded to a much higher standard and it worked very well, no damage to any of my three arrivals today.

As usual the livery application is superb as you would expect from such a high value item. The 31/1’s do not have a headlight, but have a radio pod as an add on extra, there is also a pair of etched toughened drivers window surrounds. The 31/4 does have a headlight and also has the little extra bag as well. Neither class come with Snowploughs, which is fine for the 31/4’s but several 31/1’s were fitted.

Now to search my files to find suitable numbers for each.

Work on N Gauge Layout (3/8)

Things progress at a good rate on the layout. All the cork and polystyrene is now laid and board one has had the Polyfilla added to the edges of the cork.

The river and two ponds have been formed, the road is laid including a little junction on board two. Board two still needs some Polyfilla added to the edges and the basics for the level crossing need adding.

I have tried to keep all materials as light as possible and the use of heavier materials is kept to a minimum. Based on this I decided to seek an alternative to putting plaster bandage on the polystyrene and tested a few alternatives, in the end I tried EVO-STICK General Purpose PVA, this product is used for sealing, priming and bonding, I brushed it on and left it overnight, I checked it this morning and it worked well with one coat, although I may do two coats to be sure.

The next job will be to smooth the Polyfilla down and give the whole lot a coat of various coloured emulsions.

OO Steam Loco weathering.

Here we have three OO steam loco’s weathered to a medium standard. They have all been renumbered before weathering. As they retain the tension lock couplings at both ends, they have not had detailing added.

Bachmann J72

J15

Ivatt 2MT

O Gauge Wagon Variety

Here we have seven wagons I have had for several weeks, they are for a couple of friends.

Mikes wagons

Colins Wagons

Note the faded lettering

This is for Colins new Layout – Dunwich Tramway.

SM32 weathering – Simplex and wagons

It seems a long time since these items appeared at the Garden Railway Show 2021 in a pristine state. Well, they have now been weathered for their next appearance in a couple of weeks time.

Class 20/3 pair weathered

Had a visit today from Barry Aldous (Bazza), we had not met up since September 2019, when he helped us operate a couple of layouts at an Exhibition.

We had lots to talk about and time went by so quickly. Before he went I weathered a pair of OO Bachmann Class 20/3 Locos that Barry intends to run on both RHTT and Flask trains on his Layout.

They are weathered to a light to medium standard.

Work on N Gauge Layout (29/7)

It has been a very busy two days. I have been adding the polystyrene to the MDF formers that appeared in the previous post. I have started to add a path that runs the whole length of the layout and I have also made a start forming the river banks in 1/4″ Cork. I have used polyfilla to fill any spaces in the polystyrene and to ensure a nice gentle slope down to the track.

Work on N Gauge Layout (26/7)

Yet another busy day on the layout. First job today was to chamfer all the cork edging on the outside of the tracks, very happy with the result, well worth the effort.

I have sketched out various embankments around the layout and today I started to form the outside MDF boundary. The below photos show the work done so far on the first board.

Work on N Gauge Layout (25/7)

I am posting every move I make with the Kato track as it may be useful to others. Today I am preparing the track on the scenic sections for ballasting or should it be ballasting between the tracks and on the edges. I have purchased two packets of compatible Kato ballast to use, but at £7 a pack for such a small amount I decided to put a further layer of cork in all places that will be ballasted later to save on the amount of ballast needed. The below photographs show how I cut the cork to size, glued it and temporarily pinned it down, the pins are Peco and all are salvageable.

I intend to do a small section to see what is the best way to glue the Kato ballast down. I will use sandpaper to make a chamfer on all the cork on the edge of the track, this should help the finished appearance. You will note that I have started to disguise the wiring for the board joins.