Mission Road – ‘finished’

At last I have got Mission Road into a state that I am reasonably happy with. I say finished but in reality the budget for this project just run out and another dabble in OO beckons. I hope to have another (the third) loco posing session soon, as that’s when it all comes together. I also need a full shake down session testing all isolating sections etc.

Here are the last cameos completed.

IMG_1767

IMG_1768

IMG_1769

IMG_1770

IMG_1773

IMG_1775

IMG_1778

IMG_1781


IMG_1787

IMG_1788

IMG_1789 (2)

Adding Backscenes to OO Layout.

Last couple of days spent on adding 3mm MDF Backscenes to my two scenic boards for the OO layout (still no name).

Still waiting for 2nd traverser kit to turn up, so fill in jobs being done a little out of order.

IMG_1800

IMG_1801

IMG_1802

IMG_1803

IMG_1804

IMG_1805

The two scenic boards on OO Layout

It has been a very busy day outside today – pleased to find some shade most of the day I have now married up the two scenic boards and I now have the rails over the join – I used copper clad sleepers on the edges to reinforce them.

I then turned to the river. When I cut the river out of baseboard, I kept the piece cut out – this is trimmed to the size of the bridge and then ‘let in’ to the edges of the river.

I then finished all the track laying according to my plans and advice from our group members.

Here are a few photos in sequence of todays work.

IMG_1749

IMG_1748

IMG_1751

IMG_1755

IMG_1756

IMG_1757

IMG_1758

IMG_1759

IMG_1761

IMG_1762

IMG_1763

Well that’s about it for now – the second traverser is still about a month away, so apart from a few electrics on the two track join and possibly a little landscaping, that’s it.


Making a river on new OO layout

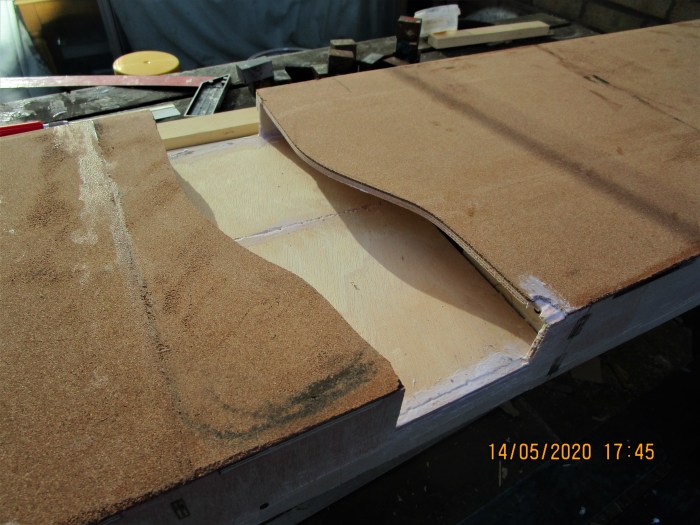
I have managed to take photos of the methods taken to make a river. Firstly I need to say, I used this method as I wanted to add to the integrity of the baseboard. Polystyrene would be my preferred method, but that would not enhance the strength of the baseboard. Before cutting the river shape out of the baseboard, I re-enforced the lowest level with 2″ x 1″ softwood, this will be the main strength of the baseboard after cutting. I then cut the river shape and added the river base.

IMG_1718IMG_1738

IMG_1739

The next thing I did was to cut stout cardboard to form the inner banks. I then made some templates to the actual formers. After that I added re-enforcing strips between the formers.

IMG_1729

IMG_1728

IMG_1731

IMG_1730

IMG_1733

IMG_1734

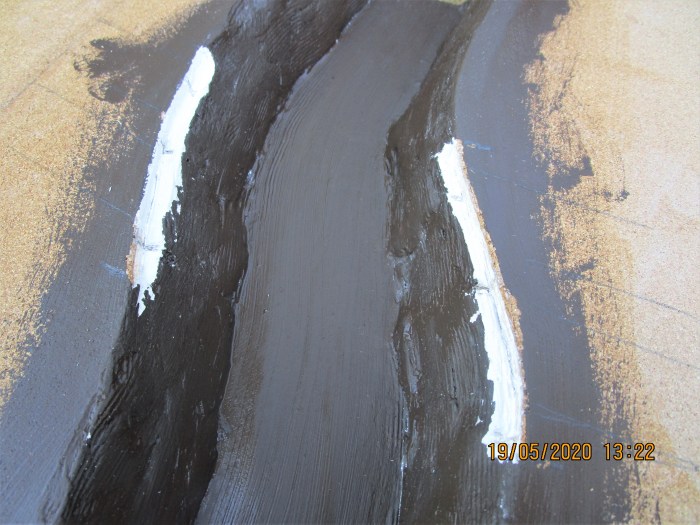
After letting the whole thing dry overnight, I stuffed the spacers with newspaper. Finally I added a coating of ‘polyfilla’. After leaving overnight again, I smoothed the whole area down with a small file and sandpaper,  after vacuuming and cleaning up I applied a coat of brown emulsion paint.

IMG_1736

IMG_1737IMG_1740

IMG_1741

IMG_1743

IMG_1744

I now feel comfortable with the strength of the baseboard. But again I will say that lighter materials will be used to form other undulations on the boards.


Strachan Remembered -No. 2

After recently posting some photos of Strachan and a conversation on the phone with Les Williams, here are some more photos Les sent me. Great Layout that we made over 20 years ago and kept in great condition by Les.

93024594_868916200250034_366968332257067008_n

92830427_257141032000135_4930261150274158592_n

97468093_562013921373553_3854959969677869056_n

97977812_604988593699794_2931879813100601344_n

96581205_2602300416752266_3572857257727098880_n

96583714_240872697202559_493881583606956032_n

95894100_620094055248069_5059823284049149952_n

92642776_585167092088081_2371339688519663616_n

93116297_1597523083732870_7697305272515035136_n


Traverser/Board one electrics done.

Over the last two days a lot of work has been completed, not least the electrics. A Gaugemaster DC twin track controller and track cleaner has been used, both retrieved from an old layout. The centre three tracks have been split with isolation to allow a total of ten trains to be stored on the traverser.

My method with the electric’s is to have all the tracks on one side permanently coupled (the blue wire) with the full contact on the other track being made by the bolt and loops (the red wire). Simple but it works.

All the track on the first scenic board has been laid and the controller etc. installed. The back board scenic board bases have been added. The second scenic board has been started with a cut out for a river.

The second traverser is not due until Mid June – so after further work on the river and adding track – I will have a break from this un-named layout

IMG_1721

IMG_1722

IMG_1724

IMG_1725

IMG_1723

IMG_1726

IMG_1719

IMG_1718

Traverser Bolts and loops added

Today has been spent adding the bolts and loops to allow access to all storage on the traverser deck. I also added some track on the first of the two 6′ scenic boards.

I think you will get the idea of what the two track main line will look like. I have taken this option because I wanted to simply show trains running in the country, no station, yard or anything else. This is what 80% of our real railways look like and it is seldom modelled.  I am however considering making a loop on both the up and down lines. These loops will give the viewers at Exhibitions something to see all the while, instead of empty tracks.  It is also potentially two extra storage tracks, only in view of everyone.

The second traverser is not due for another six weeks so the two 6′ scenic sections will be worked on, after a decision on the loops is made. I have many thoughts on what I would like to see on the boards and planning will continue.

IMG_1703

IMG_1712

IMG_1711

IMG_1710

IMG_1709

IMG_1708

IMG_1705

IMG_1704


Traverser Final Amendments.

As I said on the post before this one, I had an idea to increase the length on the other end of the deck. I worked out how I was going to approach it, but discretion being the better of valour, I shelved the project!

The other concern I had was the balance when the deck was totally extended outwards. This I managed to sort by lessening the travel of the deck – I added another point to the innermost two tracks – see photo’s below.

I have made all the bolts and loops for the locking/electric contact system. I have also added the male and female baseboard joiners to the traverser and the first scenic board.

I have also soldered copper clad sleepers to the ends of all tracks for protection.

IMG_1694

IMG_1695

IMG_1693

IMG_1696

IMG_1697

IMG_1698

IMG_1699

IMG_1700

IMG_1701

None of the Bolts and Loops are Screwed and/or glued yet – they need drilling and a handle added.


Six Inch extension to the Traverser.

Well, its been quite a day, I turned the four inch extension into a six inch one. I then glued the extension to the traverser, thankfully it worked well. This was first thing this morning and after it was all dry I still had plenty of time left to do some track laying. Out came the gauges to ensure all was equally spaced and track laying commenced.

Below are some photographs of my attempts, the track is lightly pinned so that adjustments can be made, the track will ultimately be glued down when I am 100% happy!IMG_1692

IMG_1690

IMG_1689

IMG_1687

IMG_1684

IMG_1685

IMG_1688

Very happy with the outcome ——–but I have an idea to add another extension to the other end – This is a far more difficult proposition as it needs to be extremely precise.

I have also encountered a possible balance problem when the deck is fully extended – some lead ballast in the base may be necessary.


Traverser -an extension!?

After making the traverser and testing its capacity, I felt that I would like to find a way to enlarge it slightly, mainly to hold four Mk1 and Mk2 coaches and a medium size Loco.

After much testing and finding some raw materials I began to test a few ideas. Although limited by having only a small amount of wood, I managed to come up with a prototype that would allow a four inch extension and an end stop.

Below are some photographs of the extension, albeit without actually gluing the extra piece on to the traverser.IMG_1674

IMG_1675

IMG_1677

IMG_1678

IMG_1679

IMG_1680

IMG_1681

IMG_1682

IMG_1683

Well, that’s it, four coaches and a Class 31 is now fine – certainly looks better than three. I now need to decide whether to buy some more wood and make a prototype  5 or 6 inch!